


State Repository Service high CPU usage needs a trigger check before a service reset. If Task Manager shows this Windows component staying busy, first finish pending Windows and Microsoft Store updates, restart once, and repeat the action that causes the spike. If opening one app reliably brings the load back, repair that app. If Start, Settings and several apps also fail, investigate Windows app-deployment errors and system repair. Permanently disabling the service or deleting its database can leave you with a lower CPU graph and broken apps.
The useful question is what keeps asking Windows to do the same work. The steps below separate a brief burst of activity from a repeatable app problem and show when to move from app repair to Windows recovery.
What does State Repository Service do?
StateRepository is the service name for State Repository Service, part of the infrastructure supporting the Windows application model. It is not a third-party optimizer and its name is not a malware detection. Microsoft describes that infrastructure role and marks the service “Don’t disable” in its Windows IoT Enterprise service guidance. That document covers specialized Windows editions; its startup-type table is not a reason to change the defaults on your home PC.[1]
In Task Manager, it normally appears under a Service Host process. The host may be doing work on behalf of an app or a Windows component, so a busy service does not identify the original caller. A screenshot of high CPU alone cannot tell you whether the cause is an app update, a recurring failure or something unrelated running in the same host.
1. Confirm the service and record the trigger
- Press Ctrl + Shift + Esc, open Processes, and sort by CPU. Expand the busy Service Host entry and check that it actually names State Repository Service.
- Open Task Manager’s Services view, locate
StateRepository, and note its PID. Compare that PID with the busy process in Details. If other services share the PID, the process total does not isolate this service’s CPU consumption. - Note when the load starts: immediately after sign-in, during Store updates, when launching a particular app, or after opening Start. Record whether it settles when the update finishes or the app closes.
- Save your work and restart Windows once. After updates finish, compare a short idle period with the same app action. Change one thing at a time so that a falling CPU graph tells you something useful.
If the PID is difficult to find, open Command Prompt and run sc queryex StateRepository. This reads service status and its process ID; it does not stop or reconfigure anything. The PID can change after a restart, so use the current value.
Do not use a universal percentage or stopwatch cutoff as the diagnosis. A brief burst that ends when an installation completes is different from a spike that returns every time you open an app or leaves the desktop stuttering while idle.
- Load appears during updates and then settles. Let Windows or Store updates finish, restart if requested, and confirm that apps open normally. Avoid interrupting deployment with service-stop commands.
- One app starts the spike each time it opens. Match the time to Reliability Monitor or AppX events, then update or repair that app.
- Only one Windows account is affected. Focus on that account’s app state. A working second account is a useful comparison, not proof that the original profile must be deleted.
- Several apps, Start or Settings fail after a restart. Check deployment errors, run supported system repair, and consider a repair reinstall if broader failures remain.
- The executable is unexpected or activity follows an unknown installer. Verify the file and investigate malware separately. CPU usage by itself does not establish an infection.
2. Match app failures to the CPU spike
Search Windows for View reliability history, or press Win + R and run perfmon /rel. Select a failure near the time you recorded and open its technical details. An application name, package name and repeated timestamp give you a more useful starting point than the generic Service Host label.
For installation or update failures, run eventvwr.msc. Expand Applications and Services Logs → Microsoft → Windows → AppXDeployment-Server → Operational. Microsoft recommends this log as the starting point for app-deployment errors.[2] Look at recent events matching your reproduction, not every old warning on the machine.
- The same package fails repeatedly: note its name, error code and the action that produced it. Repair or update that app first.
0x80073CF6: this means a package could not be registered. It does not, on its own, establish that the whole repository is corrupt.0x80073CFE: Microsoft identifies this as a corrupted package repository. Preserve the event details and move toward supported Windows recovery; do not treat a generic high-CPU screenshot as equivalent evidence.
Example: suppose CPU rises whenever you launch Photos, Reliability Monitor records a Photos failure at the same time, and the deployment log repeatedly names that package. The next useful experiment is a Photos update or Repair, followed by the same launch test. If the spike remains after Photos is repaired and unrelated apps also fail, broaden the investigation. This is a diagnostic example, not a claim that Photos is a universal cause.
If the failing component is specifically the Start menu, use the StartMenuExperienceHost.exe recovery guide. If Task Manager instead points to the app’s window host, the ApplicationFrameHost.exe guide helps separate that process from the app it displays.
3. Repair the app you identified
Check Windows Update and the app’s update page first. For a supported Windows 11 app, open Settings → Apps → Installed apps, select its three-dot menu, then Advanced options → Repair. Microsoft recommends Repair before Reset where those options are available.[3] On Windows 10, the corresponding list is called Apps & features.
Test the same action after Repair. Use Reset only after saving app-specific work and checking what the confirmation says will be deleted; local data, settings and sign-in state may be cleared. If the app has no repair option, use its official installer or publisher’s documented recovery method. Do not download replacement Windows DLLs or EXEs from file sites.
If the spike follows game capture or an overlay, temporarily turn off that optional feature in its own settings and repeat the same test. Keep the change only if the symptom follows it. A Game Bar fix from someone else’s forum thread is a hypothesis to test, not a reason to remove unrelated Windows packages.
When another existing Windows account is available, compare the same app there after signing out of the affected account. Do not delete the original account or move personal files simply because the second one works. On a managed PC, give the package name, event code and reproduction steps to IT before changing app deployment settings.
4. Use system repair for broader Windows failures
When several Windows apps fail or app repair does not resolve a wider problem, open Terminal (Admin) or Command Prompt (Admin). Run DISM.exe /Online /Cleanup-Image /RestoreHealth and wait for it to complete. Then run sfc /scannow and let verification reach 100%. Microsoft specifies DISM before SFC.[4]
Record the outcome rather than repeatedly running both tools. If SFC reports repaired files, restart and repeat the original trigger. If it cannot repair files, retain the error details for recovery. A clean SFC result checks protected system files; it does not settle every app-state problem.
If Windows 11 remains broadly broken, open Settings → System → Recovery → Fix problems using Windows Update → Reinstall now, where available. Microsoft says this reinstalls the current Windows version while preserving apps, files and settings.[5] Back up important data first and keep the PC connected to power and the internet. This is a different action from Reset this PC.
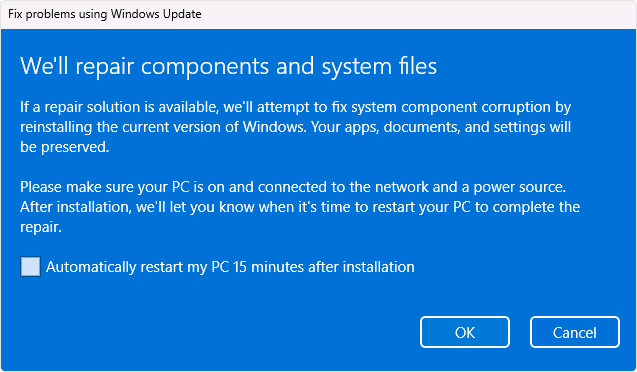
The option may be missing on managed devices or unsupported configurations. If Settings will not open, or the repair option is unavailable, use Microsoft or your organization’s supported recovery route. Avoid converting a CPU issue into an uncontrolled repository rebuild.
Should you stop the service or delete StateRepository files?
Do not permanently disable State Repository Service as a performance fix. Stopping infrastructure can remove the visible work without correcting the request that triggered it. It may also interrupt dependent app operations. If Services refuses to stop it or warns about dependencies, do not force-kill its host or change permissions to get around that response. A normal Windows restart is a safer first reset.
Be particularly careful with instructions that take ownership of C:\ProgramData\Microsoft\Windows\AppRepository, delete StateRepository-*.srd files, or re-register every AppX package for every user. These are system-wide changes, not routine cache cleanup. A backup of a few database files is not a complete rollback plan for app registrations and permissions.
A repository rebuild belongs in a guided recovery process after specific corruption evidence, with a verified backup and a plan to restore Windows if apps or the shell stop working. The supported repair-reinstall route above is the better next step for most readers. Do not remove the repository solely because a guide promises an immediate CPU drop.
When a security check makes sense
A genuine State Repository Service spike is not, by itself, a reason to buy a cleanup tool. If the host executable has an unexpected path, a security tool raises an alert, or the problem began after a crack or unknown installer, follow the svchost.exe identity and malware check before deleting anything. The normal service host is a Windows component such as C:\Windows\System32\svchost.exe; a filename alone does not prove legitimacy.
If suspicious software ran and unwanted activity keeps returning, a bundled module or startup mechanism may still be present. You can download Gridinsoft Anti-Malware, update it, run a Full Scan, review detections, apply cleanup and restart. Return to the original CPU test afterward. A malware scan does not repair the State Repository database or guarantee that every Windows performance problem is resolved.
If the process path is wrong, the name imitates a Windows component, or high CPU started after an unknown installer, scan for hidden miners, services, startup entries, and bundled components.
Scan for unwanted softwareConfirm the fix with the same test
After the final restart, open the app or Windows feature that originally triggered the load. Confirm that it works, the service returns toward its idle baseline, and the same deployment error no longer repeats. Keep the relevant event code, app name and repair result if the issue returns. Those details tell the next person investigating where to look; another screenshot of a busy Service Host does not.
References
- Microsoft. “Guidance on disabling system services on Windows IoT Enterprise.” Microsoft Learn, accessed September 21, 2026. Service guidance and scope.
- Microsoft. “Troubleshooting packaging, deployment, and query of Windows apps.” Microsoft Learn, accessed September 21, 2026. App deployment logs and error codes.
- Microsoft Support. “Repair apps and programs in Windows.” Microsoft, accessed September 21, 2026. App repair options.
- Microsoft Support. “Use the System File Checker tool to repair missing or corrupted system files.” Microsoft, accessed September 21, 2026. DISM and SFC procedure.
- Microsoft Support. “Fix issues by reinstalling the current version of Windows.” Microsoft, accessed September 21, 2026. Windows Update repair reinstall.