


Secure System high memory usage in Windows 11 needs a measurement check before a security setting change. The Secure System entry is associated with Windows’ isolated security environment. It is not an ordinary app to uninstall, and the RAM percentage at the top of Task Manager is the whole PC’s usage—not the amount consumed by that row. Record Secure System’s actual memory value, check whether it keeps growing under the same workload, and verify which virtualization-based security features are running.
If the PC is responsive and the value stays steady, leave the protection enabled. If memory keeps climbing until apps stall, the useful next step is to identify what changed: an application, driver, virtual machine, Windows update, or security configuration.
What is Secure System in Task Manager?
Windows uses virtualization-based security, or VBS, to separate sensitive operations from the ordinary operating-system environment. Memory Integrity, also called HVCI, uses that isolation for kernel code-integrity checks. It is one security feature within that environment, rather than another name for every VBS service. [1]
Credential Guard is a different VBS consumer. It isolates certain credentials, including NTLM password hashes and Kerberos ticket-granting tickets, from the normal operating system. A machine can therefore have a reason to keep VBS running beyond the Memory Integrity switch. [2]
Do not confuse Secure System with Antimalware Service Executable, a scanner’s process, or Memory Compression. Those labels describe different work. Nor does a downloaded program become legitimate because its filename resembles “Secure System.” A separately installed executable needs its own source and publisher check.
First, measure the right memory number
Save your work and use Start → Power → Restart. Once startup activity settles, open Task Manager with Ctrl + Shift + Esc. Keep the same applications open for each comparison. These steps are a diagnostic comparison, not a benchmark or a promise that restarting repairs the cause.
- Record the Secure System row. In Processes, note its memory value in MB or GB. Keep the same view and memory column throughout the check.
- Record the whole PC. Open Performance → Memory and note In use, Available, and Committed. The first Committed number is the current total; the second is the limit. Record Paged pool and Non-paged pool too if the problem builds over time.
- Reproduce one ordinary task. Open the app or start the workload that normally triggers the slowdown. Record the same values when the problem appears.
- Close that workload normally. Compare again after background activity settles. If it happens after sleep, record that separately rather than mixing a fresh restart with a resumed session.
Do not add up the visible Processes list and assume the difference is stolen RAM. That list is not a complete accounting of all physical memory. For a closer allocation view, Microsoft’s RAMMap provides categories, process working sets, file-backed memory, and snapshots. Use it to compare where memory goes; it does not automatically identify the cause of every protected-memory allocation. [4]
A high total can point to another workload
For example, suppose a 16 GB PC shows Secure System at about 250 MB before and during a slowdown, while total memory rises from 45% to 90% after opening a large project. These are illustrative numbers, not a normal range or a test result. Because Secure System’s displayed value barely changed, start with the project’s app, its helpers, and the other changing memory categories. Turning off VBS at this point would change a second variable before identifying the first.
The opposite pattern deserves a different investigation: if Secure System itself grows during the same repeated task and does not settle, keep that record and correlate it with the Windows build, driver versions, and active security features. A single large value cannot distinguish a stable allocation from a leak.
Read the pattern before choosing a fix
- Secure System stays steady; another app grows. Close and reopen that app, update it, and repeat the same task. Check its extensions or helpers if the growth follows them.
- Available memory falls and committed memory climbs. Identify the growing workload. Leave the page file system-managed during diagnosis; do not run a RAM cleaner to hide the trend.
- A kernel pool keeps growing across repetitions. Record the pool trend and recent driver changes for support. The pool size alone does not identify a particular driver.
- The problem starts only with a VM or after sleep. Compare once with the VM shut down normally, or after a fresh restart. Preserve the exact trigger in your notes.
Check VBS and Memory Integrity separately
Search Start for System Information or msinfo32, run it as administrator, and select System Summary. Near the bottom, inspect Virtualization-based security and the entries for security services configured and running. “Configured” and “running” are different states; copy what your machine actually reports. [1]
Then open Windows Security → Device security → Core isolation details and record the Memory Integrity setting. The Device security page shown below is the entry point; available sections depend on your device. [3]
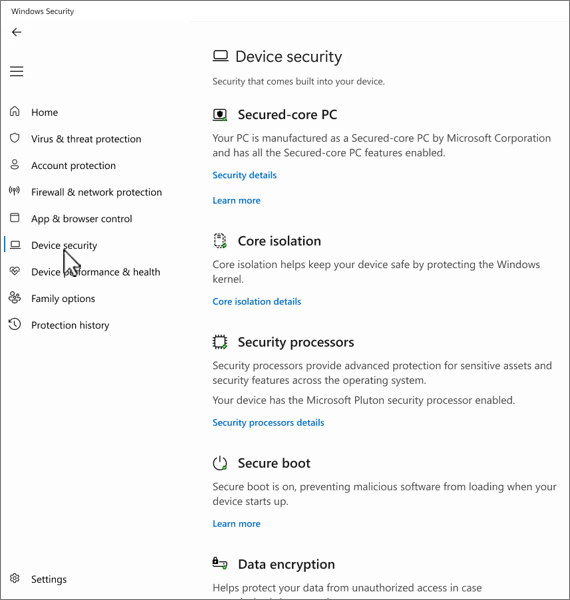
These checks answer which protection is active. They do not prove that protection caused the slowdown. Likewise, seeing that a hypervisor is running does not mean you deliberately installed a virtual-machine application: VBS itself uses the Windows hypervisor. [1]
Fix the trigger before reducing protection
Start with the change closest to the first bad session. Note the Windows build with winver and review Windows Update history. Finish pending updates and restart, then repeat the same workload. If the symptom follows a particular application or VM, update or repair that component before changing system-wide security.
For a driver-related symptom, use Windows Update or the PC/device manufacturer’s package for the exact model. Record the old version so a supported rollback remains possible. Avoid bulk driver updaters that replace several packages at once. Our PnP driver safety guide explains how to assess the package source.
Memory Integrity can expose application or driver incompatibility; Microsoft recommends updating an affected driver when it fails to load or crashes. That establishes a compatibility path to investigate, not a diagnosis for every high-RAM report. [1] If the symptom is specifically a fingerprint reader that stopped working, follow the Windows Hello and Memory Integrity checks. If the main symptom is CPU time under System Interrupts, use the separate driver and device interrupt guide.
Should you disable Secure System?
Do not try to end or delete Secure System. Treat a security-feature change as a last diagnostic comparison, after recording the problem and checking the relevant software or driver. Disabling Memory Integrity removes a kernel protection; it is not a general RAM optimization. [3]
On a personal PC, if a reproducible compatibility problem remains and you choose to test the trade-off:
- Record the current Memory Integrity and VBS states and save your work. Keep your usual antivirus protection enabled.
- In Windows Security → Device security → Core isolation details, turn Memory Integrity off and restart. Change no other security or startup settings.
- Run the same workload and compare the same memory values and actual responsiveness. A smaller number without a usable performance improvement is a weak reason to leave protection off.
- Turn Memory Integrity back on, restart, and confirm its state. Give the comparison to the device or application vendor if the fault consistently tracks that setting.
If Memory Integrity is already off but VBS still runs, do not proceed through unrelated registry, bootloader, or firmware switches to make the label disappear. Other VBS services may still be active. On a work-managed PC, send the measurements to IT; an unavailable or managed setting is not an invitation to bypass policy.
When a malware check makes sense
The Secure System label or a high RAM percentage alone is not a reason to buy a cleaner. Investigate a security angle when the slowdown follows an unknown installer, a separate same-name executable, unexpected startup entries, or recurring security alerts. Keep a flagged file quarantined while checking its source and publisher.
You can check a suspicious downloaded file with the Gridinsoft Online Virus Scanner. If it already ran and unwanted activity returns after reboot, a full Gridinsoft Anti-Malware scan can check for related detections and persistence. It does not repair legitimate VBS allocation or prove that a PC was never compromised.
If the process path is wrong, the name imitates a Windows component, or high CPU started after an unknown installer, scan for hidden miners, services, startup entries, and bundled components.
Check the PC for malwareWhat to give support if memory keeps growing
Collect the PC model, RAM capacity, Windows build, relevant driver/application versions, Memory Integrity setting, VBS services running, and your before/during/after measurements. Include whether a fresh restart clears it and the exact task or sleep/VM sequence that brings it back. Share screenshots privately with support after removing personal information. This evidence gives the vendor a repeatable problem to investigate.
References
- Microsoft. “Enable virtualization-based protection of code integrity.” Microsoft Learn, updated August 14, 2026; accessed September 10, 2026. VBS configuration and verification.
- Microsoft. “Credential Guard overview.” Microsoft Learn; accessed September 10, 2026. Credential Guard and protected credentials.
- Microsoft. “Device Security in the Windows Security App.” Microsoft Support; accessed September 10, 2026. Device security and Core isolation controls.
- Russinovich, Mark. “RAMMap v1.63.” Microsoft Sysinternals, March 26, 2026; accessed September 10, 2026. RAMMap memory analysis.